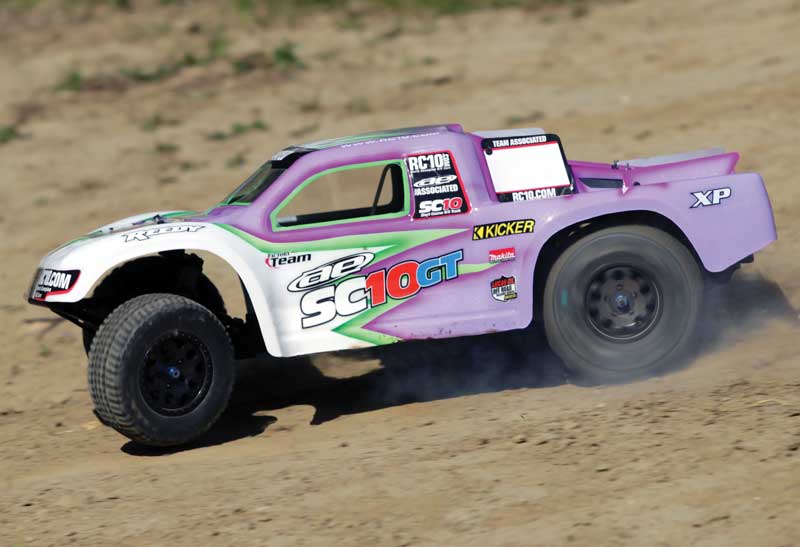
When it comes to Team Associated’s SC10GT, I guess you could say I have a bit of an obsession with this truck. Back in the 1/10-scale 2WD nitro stadium truck days, I absolutely loved racing my RC10GT and RC10GT2 every chance I could get. Between race days, I’d tear the truck down and rebuild it to nearly new condition. I always had more tires for this vehicle than any other car in my race collection and it always had a new body when necessary. Nitro stadium racing eventually died down, but when short course racing took off and I saw a lot of similarities between Team Associated’s new SC10 and the RC10GT2, I combined the two trucks years ago to make my own Project SC10GT. People who saw the truck run were amazed with its performance and when AE actually released a SC10GT RTR, you’d better believe I swooped in to do the review. The SC10GT has been a lot of fun to drive, although I usually drive it alone since this class didn’t catch on locally. I like to hit the track with my truck for practice whenever I have a chance. Up until recently, I’ve been driving a stock truck, but then decided to do some tweaking, tuning and of course, upgrading. Check out how I take the SC10GT to the next level in action.

THE BUILD
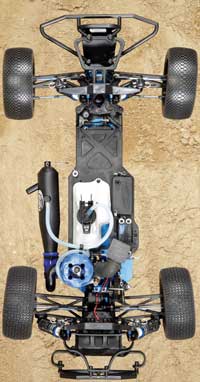
Team Associated’s SC10GT is a ready-to-run machine that is well-built from the factory with a standard setup on the suspension that makes it easy-to-drive. However, no factory-built vehicle is safe when it’s on my workbench. I started my project build up front with some of the suspension components. The front plastic bulkhead was swapped out for a Factory Team blue aluminum bulkhead and hinge pin brace. Besides being aluminum and stronger than stock, it also has set-screws to fix the suspension pins so the arms rotate on the pins rather than the pins in the bulkhead. The front Factory Team aluminum hinge pin retainer plate won’t allow a pin to escape in a crash. The next items up to be swapped from stock were all of the steel tie-rods on the truck. I’ve bent a number of steel turnbuckles over the years and always go right to titanium units like the Factory Team offerings to minimize bends and breaks. The final parts swapped up front were the shocks, from the standard blue aluminum shocks to Factory Team V2 shocks. The V2’s feature a larger body than the stock shocks, are hard anodized and come with ti-nitride coated shock shafts. The V2’s also feature a bleeder type for an emulsion shock setup and require new springs for rebound. These shocks should feel much more consistent over long nitro runs than the stock shocks.
On the rear suspension of the truck, the few changes I made were similar to the front. The rear received titanium tie-rods and the big V2 shocks, but I also installed Factory Team upper shock bushings on the front and rear. My only other change to the rear end was in the driveshafts. The truck comes with dogbones and they get the job done; however, a CV-style driveshaft is preferred on the racing scene so I used SC10 CV driveshafts. The nice part about the SC10 CV shafts is that they are not like a bone that slides around in the axle cups. What’s even nicer about them is that they have a retaining ring to help keep the universal pins in place. It did take me a little extra time to find the right way to shim the axles so they wouldn’t bind in the hubs, but a few washer spacer combos later and I had a smooth-spinning tranny.

I opened up the transmission for a fairly quick modification, swapping the stock outdrives for the ball differential from standard steel units to the Factory Team lightweight outdrives. Hey, a few grams of rotating mass cut means more power I can put to the wheel, although I doubt most drivers would actually feel the difference. One part that will make a difference, though, is the Factory Team VTS Slipper Conversion. This slipper assembly uses two pads and three surfaces for those plates to ride on in order for the power to smoothly engage the transmission or absorb shock.
Next, I moved on to a few chassis tweaks. The stock center brace went to the parts bin after I installed the FT blue aluminum center brace. This is a critical area for bracing since any flex here will mess with the gear mesh while running and this could result in some stripped teeth. Nobody wants stripped gears, especially after performing the RC8T fuel tank upgrade. The stock 75cc tank was swapped for AE’s 1/8 truggy tank that can store 150cc of fuel. The best part is that AE designed this to be an easy drop-in upgrade that requires no mods.

ELECTRONICS SETUP
The SC10GT comes with a metal geared steering servo. This is a great touch for an RTR truck, but for the track I wanted something with even more holding power and speed. That’s why I replaced the stock servo with a servo from Team Associated’s XP line, the DS1015. This metal gear servo is faster and should pump out around 200 oz./in. of torque on the Reedy LiFe 6.6 1700mAh receiver pack. I wound up using the stock steering servo in the throttle/brake location because it has just the right characteristics for an upgraded servo in this location. I used the stock Team Associated 2.4GHz radio system for photos but once I took the truck to the track for testing, I installed a Futaba 4PK-S radio system for all of its easy-to-use functions and ergonomics.
POWERPLANT
Back when I ran 1/10 nitro stadium trucks, we only ran .12 engines, but it appears most 1/10 nitro machines nowadays are coming with .18 mills. The stock engine is a .18 engine with a pull-start assembly and it’s hard for me to hit the track with a pull-start equipped car, I’d rather mess around with a starter box and that’s exactly what I wound up doing on the SC10GT project. First I swapped out the stock engine for an O.S. Engines .18TR non-pull start engine. O.S. is known for building quality, easy-to-tune engines and the .18 is a popular 1/10 upgrade mill. The .18TR I purchased only came with a slide carb so I purchased a rotary carb to retain the stock throttle linkage setup. I feel the response of the rotary carb in this application is better than a snappy slide carb feel. To allow the engine to breathe, I used a 1/8 air-filter elbow with AE’s Paper Element filter and foam pre-filter on the intake side. On the exhaust side I used AE’s Factory Team black rear exhaust header and a black Factory Team tuned pipe. When I bolted the engine in, I used the FT Non-PS engine mounts and flywheel which presented its own problems that I’ll discuss later. Since the engine needed a starter, I also went the FT route here and picked up AE’s starter box.
FINAL DETAILS
Although the two paint schemes available for the SC10GT are simple and stylish, I wanted my project to stand out. I took a SC10 Contender body and shipped it off to Larry at Kustom RC Graphics. I told him to give me something different that would stand out and he worked something up that grabbed a lot of peoples’ attention. The proper cooling holes were cut in the new body which also helps let air pass through. In the tire department, I went with AKA Gridirons in the front and Cityblocks in the rear, both in soft compound and mounted on AKA rims with red inserts for support.
OUT TO PLAY
Excited that this was my first nitro vehicle to fire up and run on a track this spring, I headed to Wolcott Hobby and Raceway, in Connecticut to get the truck powered up and to start hitting jumps. On the bench, I fueled up the tank with Powermaster 20% nitro fuel after removing the displacement plug to get a little more fuel and time on the tank and I set the truck up on a Factory Team starter box. With a few pushes and a burning rubber smell, I discovered a problem. With the NP engine mounts and flywheel, either the engine sat up too high or the chassis opening wasn’t long enough because the box starting wheel wouldn’t reach the engine flywheel. Luckily, I had all the stock parts on hand and switched the Factory Team engine mounts and flywheel back to the stock units. Now I was able to fire up the engine easily.

After a couple of break-in tanks, I hit the track. The track is primarily a 1/8 track and the SC10GT wound out on the front straight. The engine climbed in rpm and the truck hauled down the straight with impressive speed. Since this was a 2WD truck, I knew I had to get on the brakes to make the turn at the end, but I had to ease into the brakes to prevent the rear end and the front of the truck from swapping positions. I was impressed that the truck remained pretty smooth under braking conditions and I was able to roll back on the throttle without the rear end breaking free. The SC10GT has very good traction, much better than the older 1/10 stadium trucks. If anything, the truck’s forward bite gives it a lot of on-power push and you really have to slow up hard to cut the really tight turns.
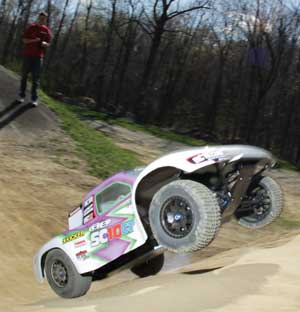
Over the jumps, the body did catch some air and the truck awkwardly parachuted to the ground and landed on the rear bumper. The only venting I did initially was cutting a hole in the window and one over the engine for cooling. I also cut the side window to gain access to the fuel lid. After the first tank had been burnt off, I headed back to the pits to vent more of the body so it would let the trapped air out. A number of holes later and the truck dealt with sailing over jumps much better. Over the rough sections, I had no issues with the rear end wagging or being kicked up off ruts. The handling of the SC10GT is very good up through the mid range of the engine’s power band, but once that .18 engine gets on it, the power is intense and you are just along for the ride.
THE LAST WORD
Building up and tuning my Project SC10GT brought back those fun memories of running an RC10GT in 1/10 nitro stadium truck. However, I think I enjoyed running the nitro short course truck better on the track because it seemed to have much more traction than I remember with the stadium racer. With the longer wheelbase, it also had better handling over jumps and ruts. Although my project got a lot of attention, I don’t see the class blowing up except for the diehard nitro guys grabbing these trucks and running them for fun. Was the build worth it? Absolutely! I fully intend on running many more tanks through this project. It helps fine-tune some driving skill and this truck just looks cool hauling down the straight with smoke streaming out the side and the sound of the .18 engine getting on the pipe. Braaap!

PARTS LIST
TEAM ASSOCIATED
• Fuel Tank RC8T- 89324
• FT Titanium Turnbuckle Set- 1420
• FT Blue Alum Non Pull Start Engine Mounts-1710
• FT Starter Box- 1750
• FT Lightweight Outdrive Set- 1766
• FT Blue Aluminum Shock Pivot Ball- 1777
• FT Servo Mount, blue aluminum- 1779
• FT Blue Aluminum Shock Bushing- 1780
• FT V2 1.02 Threaded Shocks- 7476
• FT V2 1.32 Threaded Shocks- 7480
• Rear Exhaust Manifold- 7973
• FT Chassis Brace, blue aluminum- 7989
• FT Front Bulkhead, blue aluminum- 7990
• FT VTS Slipper Conversion91175
• FT Hinge Pin Brace, with hinge pins- 9665
• SC10 Contender Body, clear- 9876
AKA
• Gridiron SC Pre-Mount Soft Tire- 13003SRF
• Cityblock SC Pre-Mount Soft Tire- 13004SRF
REEDY
• 1700mAh 6.6V LiFe RX Battery- 638
Links
AKA, raceaka.com, 951.677.2500
Futaba, futaba-rc.com, 217.398.3630
Kustom RC Graphics, kustomrcgraphics.net
Powermaster Fuels, powermasterfuels.com, 210.635.7755
Reedy, reedypower.com, 949.544.7500
Team Associated, teamassociated.com, 949.544.7500
 RC Driver The Best In RC Car & Truck News, Reviews & Video


