Accelerate With Confidence & Lower Those Lap Times

By: The RCD Staff
To many racers, tuning your vehicle can often feel overwhelming. The suspension components consist of many parts and often have a wide range of duties that react differently as the car goes through acceleration, braking, coasting and rolling in and out of turns. There are so many things to tune, and some items have very specific tasks. Usually the obvious items, like tires, springs, oil and link locations, become the focus of our attention. That’s the first place to look and where your basic set up should start, but when lap times need just a little help it may be time to look at your anti-squat. Sure, most of us have heard of this term, but many of us just build the vehicle and leave this area in its standard setting. After all, most kits have a setting that will work in 90 percent of the conditions you will encounter. But, what about the other 10 percent? The fact is that one degree of change in this area can have a profound effect on how the car reacts. As you can imagine, the name of this term is pretty descriptive and does what it implies. However, what will changes in anti- squat do and how do we change it? On most vehicles it’s usually quite easy and once you’ve gotten a grasp on the principle, you could be using this bit of knowledge to take your vehicle to the next level. Let’s take a closer look.

1. Anti-Squat Explained
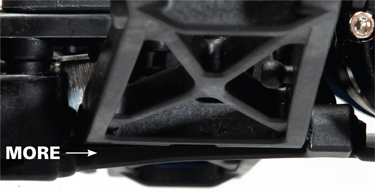
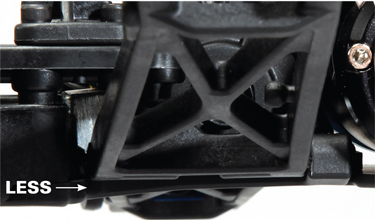
Start by focusing your attention at the rear of your vehicle. You’ve probably noticed that when you accelerate your vehicle, it shifts weight to the back and the rear squats down. When we tune anti-squat, we refer to the angle of the inner hingepin as it relates to the ground. If the inner hingepins are flat (parallel to the ground) or have no angle, then the vehicle has zero degrees of anti-squat. By raising the front of the hingepin or lowering the rear, you are increasing the degrees of anti-squat. Typically, changes are made by either swapping out the rear suspension hingepin mount or by inserting shims under the front or rear of the mount before tightening down the mounting screws. Luckily, mounts designed for the specific car are marked and show how much change they will make (usually in one-degree increments). Using shims isn’t as clear, but the manual for your vehicle should help and many cars are designed so that certain shim thicknesses will have a uniform increase in change in your anti-squat angle.
But what does increasing the angle do? Well as the name implies, as you increase anti-squat it resists the forces to compress the rear end down or “squat” under power. This of course does have some other effects that need to be discussed and made aware of. Next we are going to take a look at these trade-offs.

2. Increasing Anti-Squat Angle
By adding anti-squat, your vehicle becomes more stable and transfers less weight to the rear. This usually, but not always, means the vehicle will accelerate faster and more throttle input can be used. When a vehicle has a good balance of anti-squat (and I say balance, because an unbalanced vehicle will have a lot of other unwanted side effects), it will have a better tendency to track straighter under throttle. By reducing the weight transfer to the rear under power, more weight is kept up front and steering is also increased. However, when going in to a corner off-power, the car will have less rear grip and rotate quicker. This is key when running on higher grip tracks with tight and twisty turns and can be used to an advantage.
3. Decreasing Anti-Squat
By decreasing anti-squat you lose some of that stability and forward acceleration. Your car will have a bit more tendency to squirm and powerslide. The upside is that as you go in to a corner, you will have a little more stability. It will also be able to absorb the bumps a little better under acceleration when going through rough sections. Jumping is where things can be a bit dicey. If your vehicle is popping too high and “bucking” on the jumps, decreasing the anti-squat can help by absorbing some of that edge of the lip.
WRAP UP
Now that you have a basic understanding of anti-squat, don’t be afraid to experiment a bit. As mentioned, your kit setup will often be where you want to be 90 percent of the time, but racing is in the details and there are always the situations when you want to take advantage of the side effects and use them as a powerful tool. Just watch out for other things it can affect. Droop, ride height, camber, etc., can all be affected and need to be rechecked and compensated for. Also, like anything, it can be taken too far with very unpredictable results. It is a good idea not to stray too far from the original settings and limit your changes to one at a time so you can isolate your results. Good luck.
 RC Driver The Best In RC Car & Truck News, Reviews & Video


